From v.2.x you have to activate the theme. Firstly, please, keep in mind that the one copy of our theme must be used only on one domain. If you’ve entered the code on one domain but want to remove it to other domain you have to write us to reset the old domain.
- each new app adds JS and CSS. Loaded from new server. DNS lookup, connect to new server all these slowdowns page load. Choose only needed apps. It's up to you what is more important for your store, additional features or some more points for page speed. (I believe features is more important)
- each new element on the page slow down page speed. For example we disable product options on home page to get higher speed points.
For example, all three stores on our demo (some optimised the best, some not) has same theme code. The difference is in: a) apps, b) content, c) configuration.
5. WILL MY EXTENSION WORK WITH YOUR THEME?
please, keep in mind that our theme (and any other custom theme) isn't compatible with all third-party plugins or themes by default. You often (not always) need to customize the plugin or other theme to make it work properly with your theme. It's impossible for theme’s author to make the theme compatible with all existing plugins. Only default theme is compatible with all third-party plugins, because all plugins are designed to work with default theme. Most common case is a conflict if the plugins and the theme override the same default template file. In such cases you need to customize conflict template and merge plugin into theme template
6. HOW TO CONFIGURE LOGO IN THE HEADER
All options available for logo can be found in Sections -> Header. There are all possible options for logos - for different screens and their sizes - http://prntscr.com/nj61ml
7. HOW TO ARRANGE MEGAMENU
All menus you have to create manually. Unfortunately, it is not imported after theme’s sample data installation.
Any other specific changes have to be done in css only. Unfortunately, such additional work is beyond of scope of our general support.
9. HOW TO FIND CSS QUICKLY
To find quickly what style you need to change you can use add-on firebug for Firefox or web developer tool for Chrome or Opera (it’s included in browser. You need only right click on some element and choose “Inspect element”). In it you can choose any element and see what styles are connected with it and in what file.
10. HOW TO ADD LANGUAGES
By default in shopify the only one language is used on store front. To use more than one you have to use some application. Our theme is compatible with :Weglot , Longify
Our theme is compatible with proposed applications because code of them is added in the theme. So, you can choose any of them. After installing , please, read any instructions in the application user manual
11. HOW TO DISABLE PRESENTATION (FIXED RIGHT GEAR BUTTON)
You can disable this block in Theme settings -> Layout -> Enable presentation
12. HOW TO CHANGE NEWSLETTER POPUP TEXTS
The texts in the Newsletter popup are simple language texts. Open Edit languages section - http://prntscr.com/n0bm80
Our theme provides 2 types of Newsletter subscriptions: default Shopify subscription and Mailchimp integration. You can switch between them in Theme settings -> News subscription.
please, keep in mind that our theme uses Mailchimp embedded forms. They should work on any site independently from Shopify. Integration of any other 3rd party service is beyond of scope of our support.
You can set any sizes of slides in the Revolution. Also you can download images from our demo. Also when you upload own images you should check them on different screen resolutions.
15. HOW TO ARRANGE INSTAGRAM BLOCK
If you add separate Instagram blocks you should upload the images manually. You can remove these Instagram blocks, so, images will be uploaded from your account. Images from an account are added according to their popularity. Also Instagram account should be open to being seen in widget.
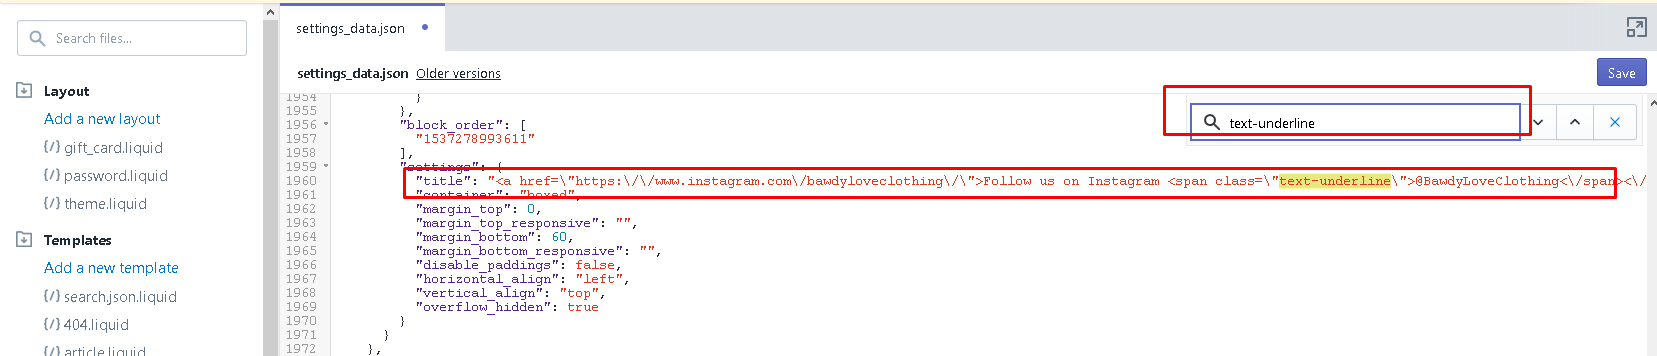
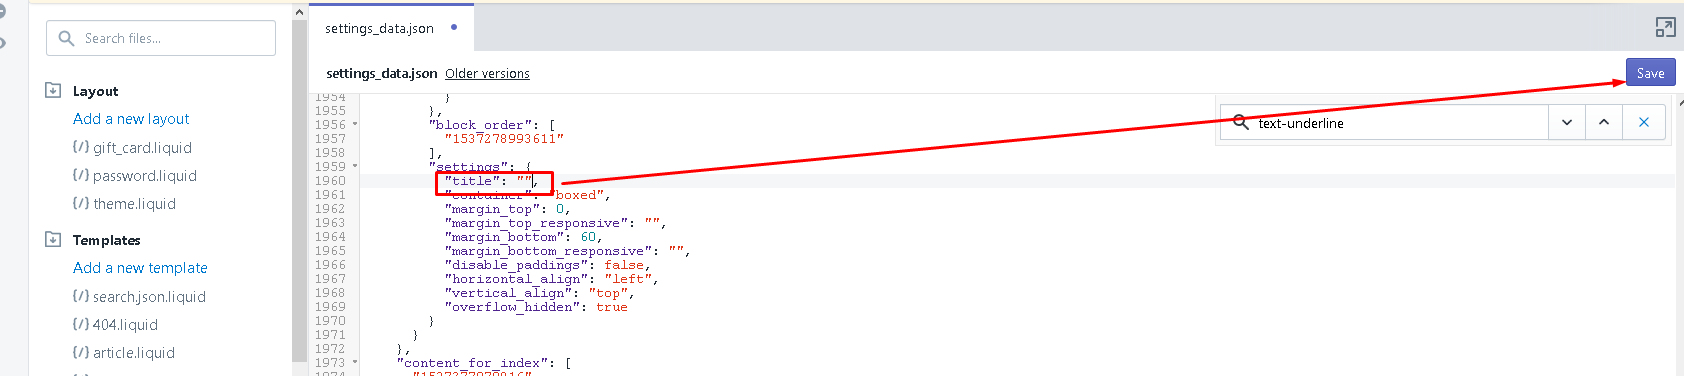
28. PROBLEM WHILE COPYING SETTING DATA FROM OLD VERSIONS TO 3.0
You may be faced with such error.
To correct this make search with the word “text-undertline”.
Make the option title empty.
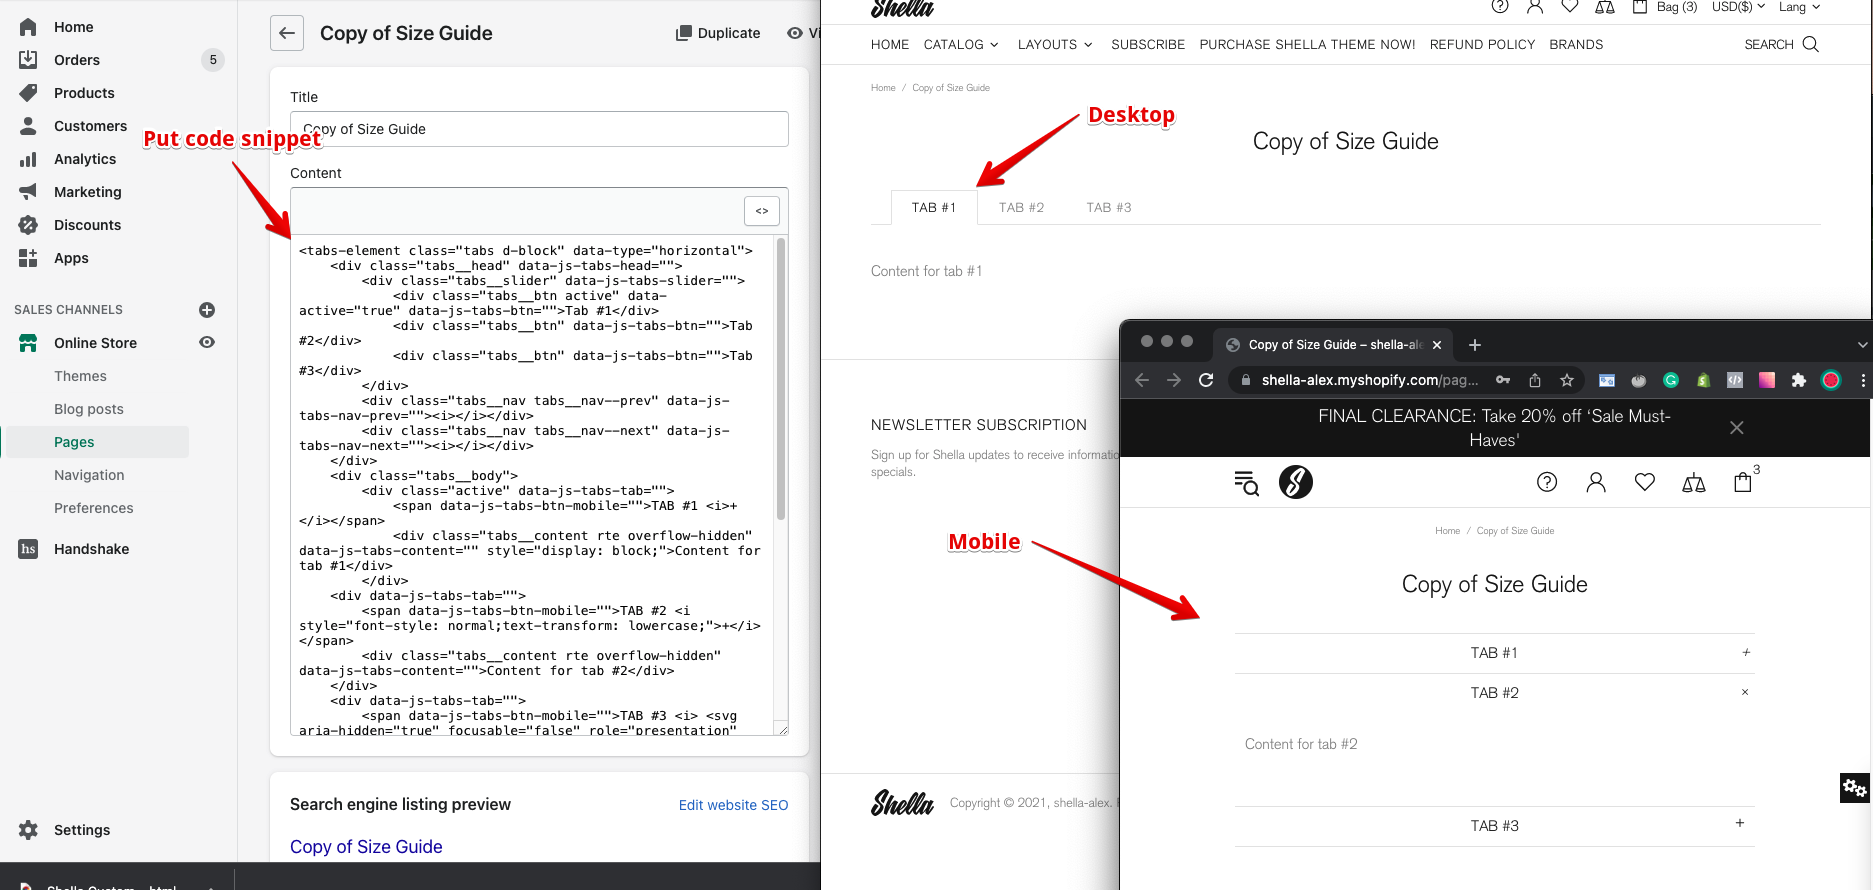
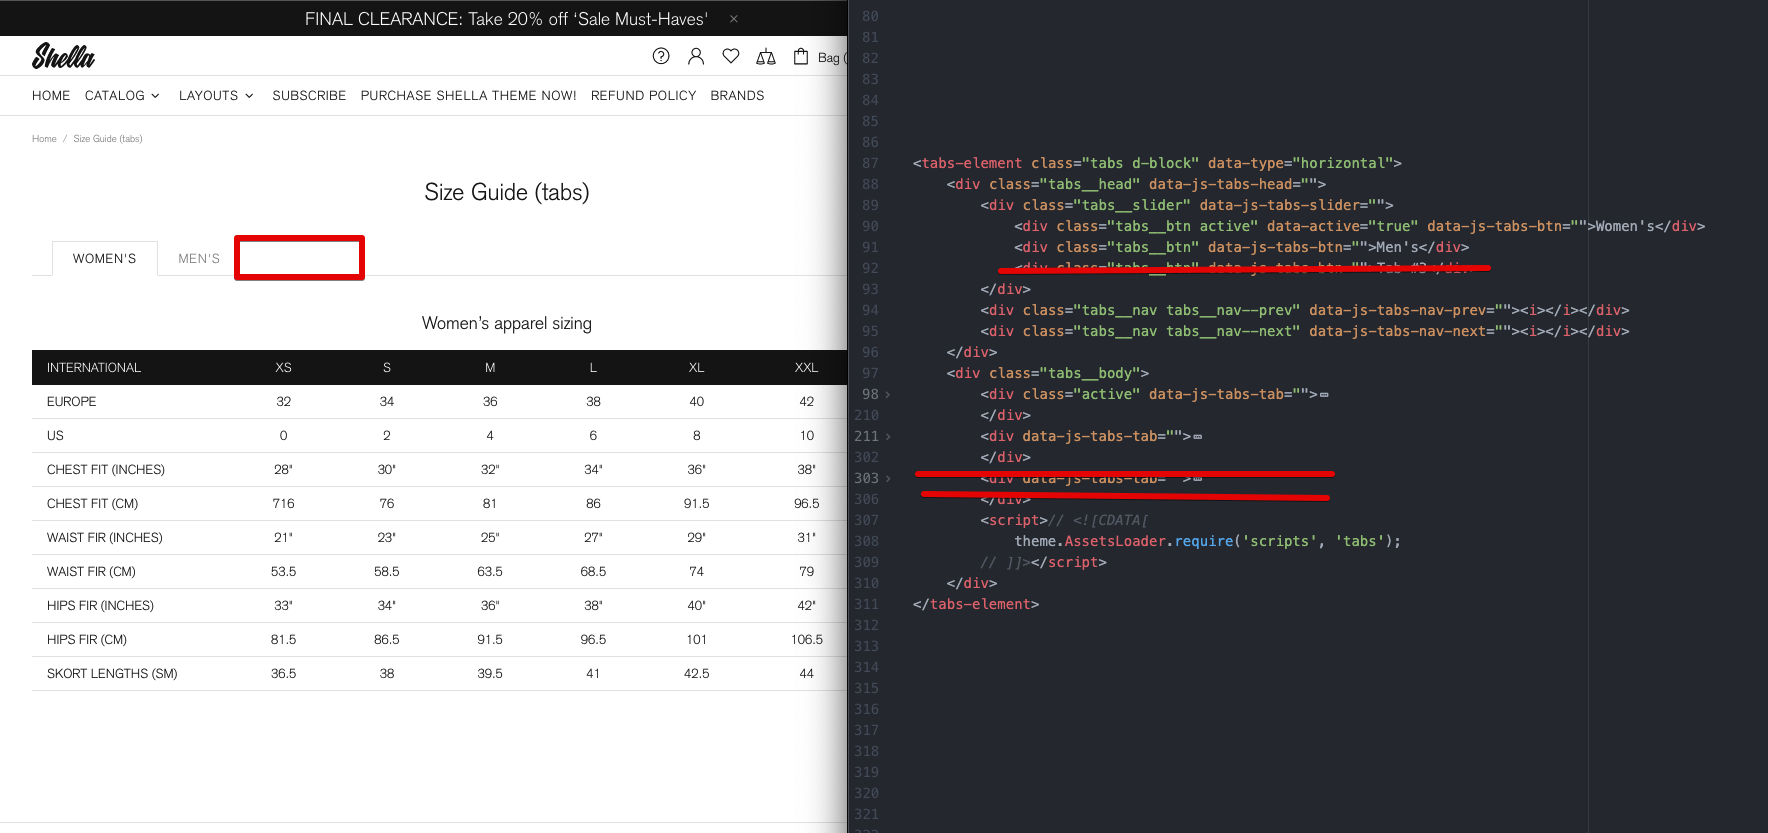
2. Shella theme :: How to add tabs in any place? HTML code snippet.
This article was created thanked Eduardo support request. I believe it may be helpful for other customers as well.
What is the HTML code snippet to add tabs in any place of the theme?
The theme has hundreds of options, you may check it in the user manual and video tutorials. Unfortunately, there is no theme option to add tabs in any place. Fortunately, you may add the following HTML code snippet to solve this task. Yep, you should deal with code, and it requires some basic HTML knowledge and Shopify online theme editor.
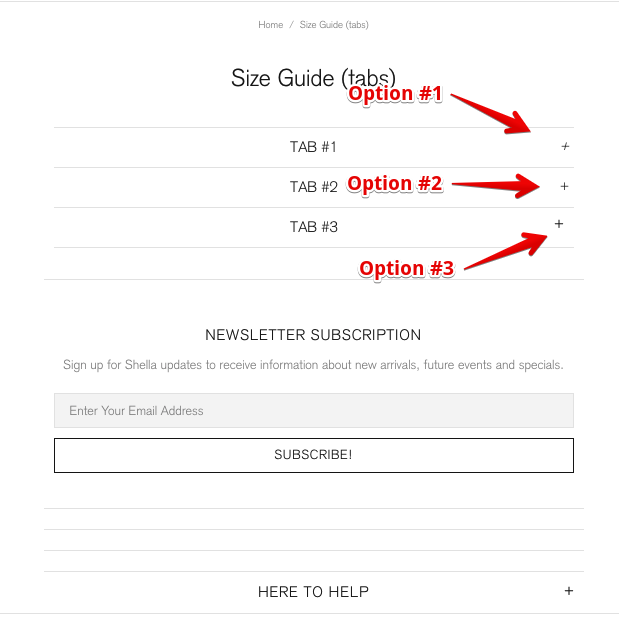
You may paste it to the content field via admin panel or paste directly to *.liquid file via online code editor. I will stick with first option. Create a new page, switch to code edit mode, paste the above code snippet you should see the following. tabs
Add content to tabs.
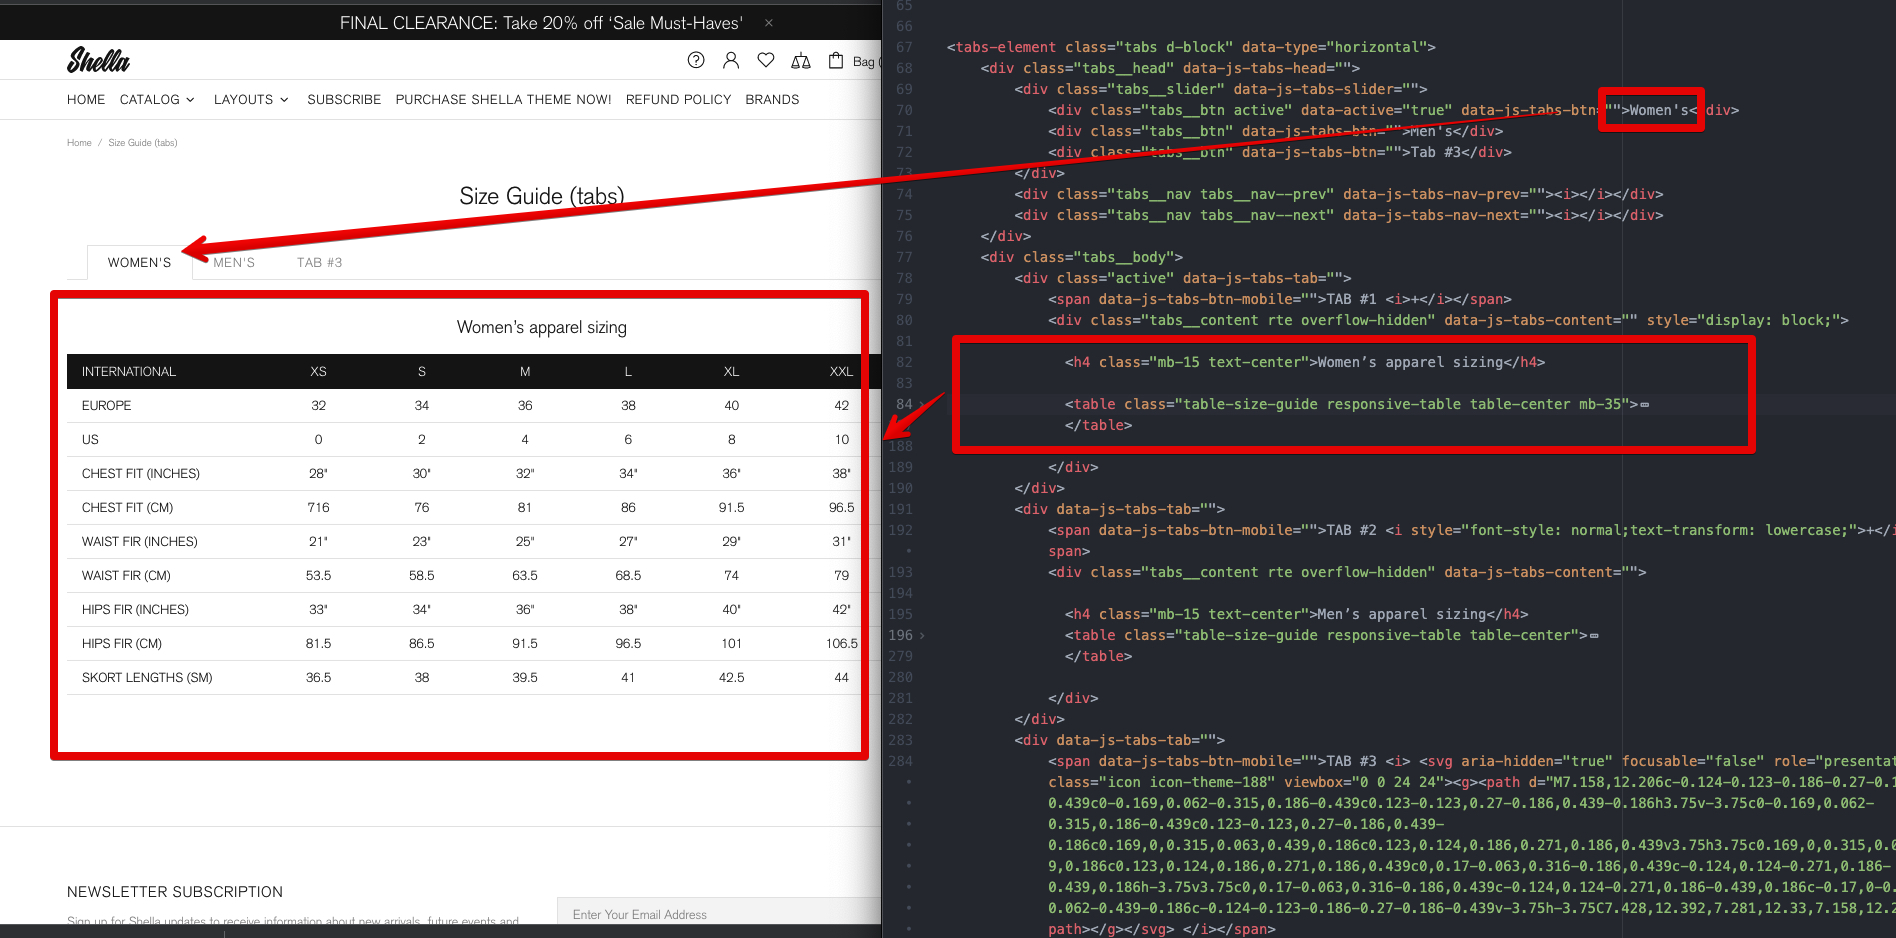
Replace texts "Tab #1", "Tab #2", "Tab #3" for captions
Replace texts "Content for tab #1", "Content for tab #2", "Content for tab #3" for tab content. The tab content may include the HTML code.
In my example I edited two tabs and put HTML code for table.
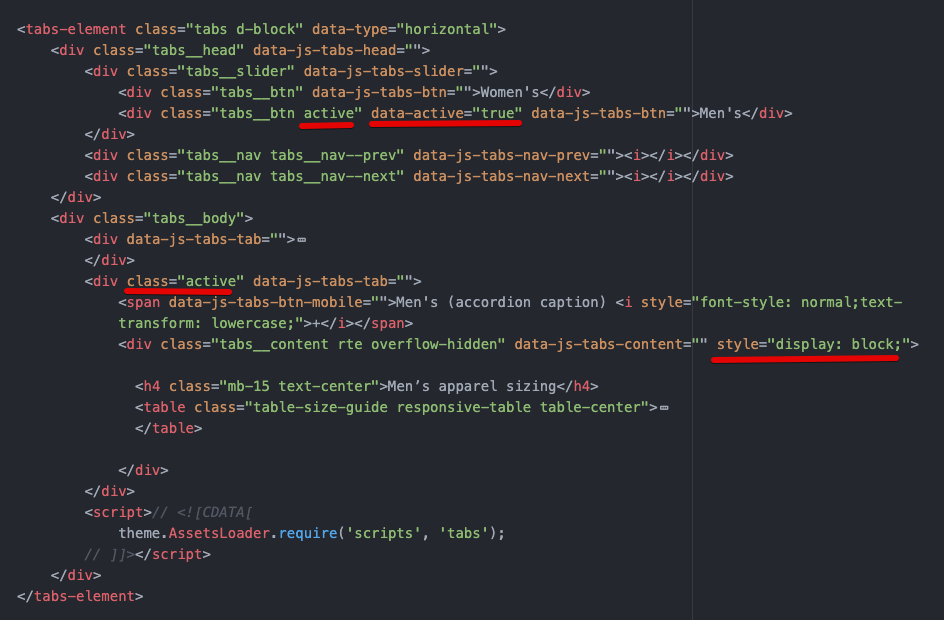
Remove tab
In case you want to remove tab, you should delete tow DIV tag with class tabs__btn at .tabs__head> .tabs__slider and data-js-tabs-tab attribute at .tabs__body elements.
I my example I will remove third tab and third DIV tags.
Add tab
To add tab you should add tow DIV tag with class tabs__btn at .tabs__head > .tabs__slider and data-js-tabs-tab attribute at .tabs__body elements.
You should keep the sequence of added tags. Second tabs__btn element will be linked to the second data-js-tabs-tab element.
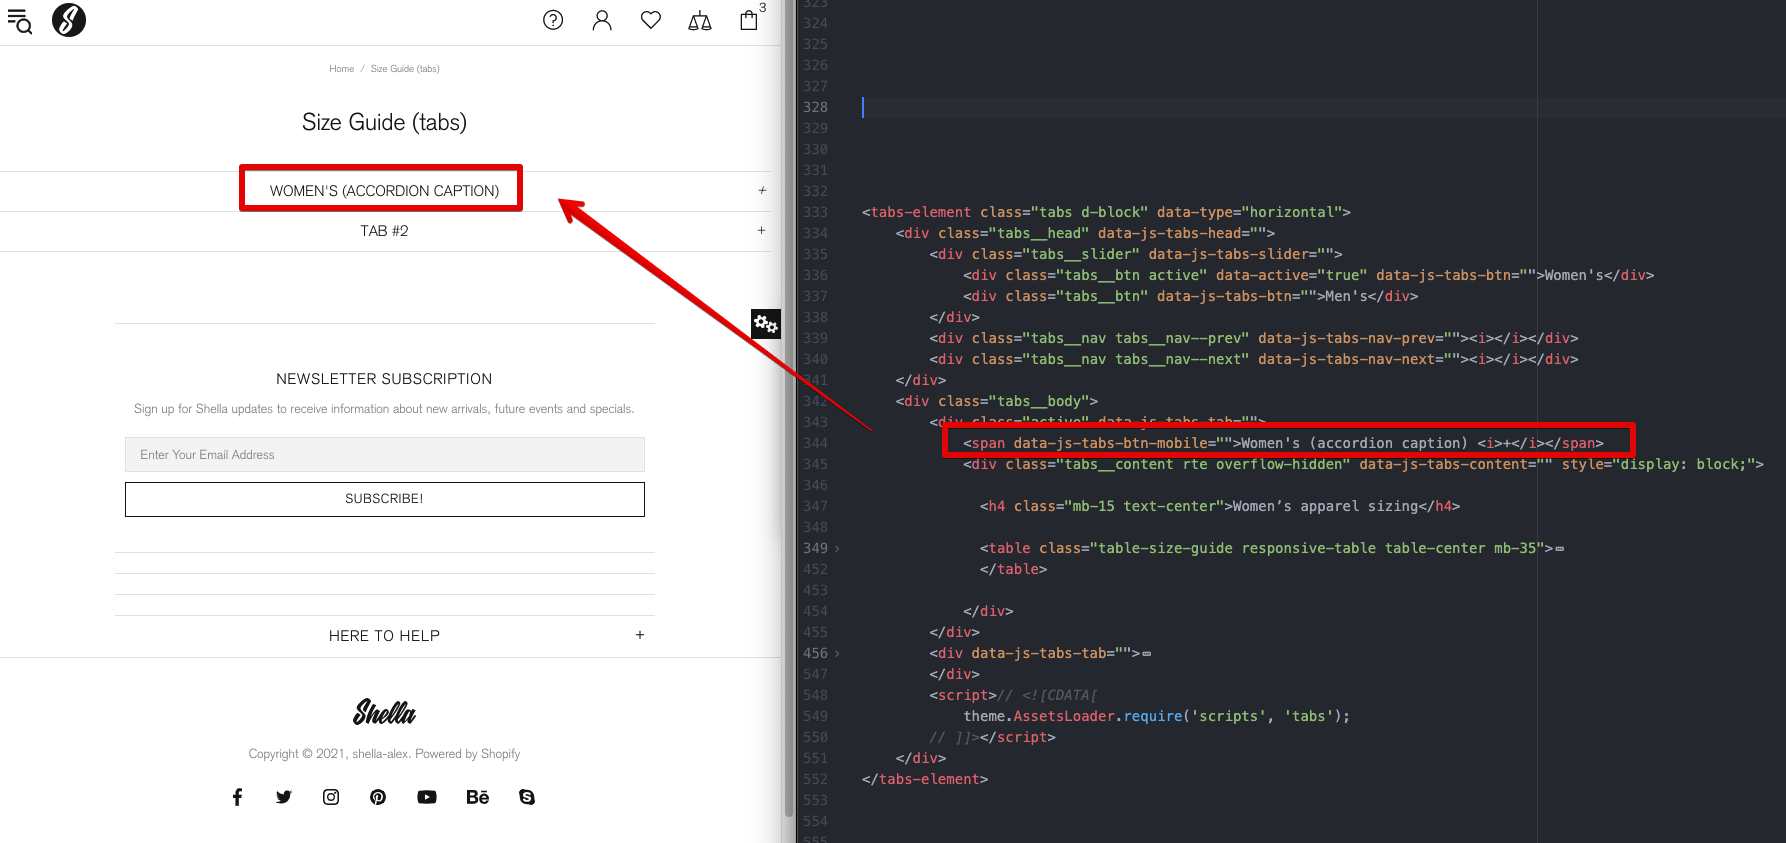
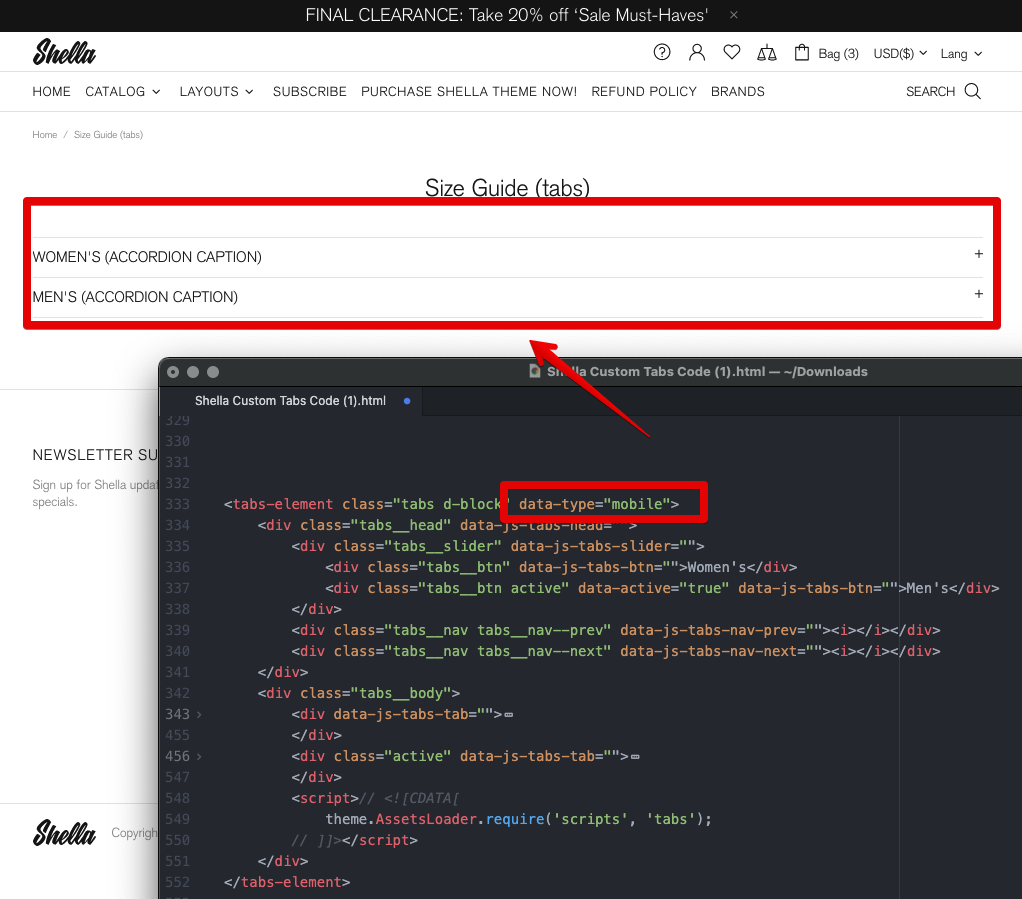
Mobile
Tabs at mobile transform to the accordion.
You should add mobile captions inside content element data-js-tabs-tab at span tag with data-js-tabs-btn-mobile attribute.
5) Disable the collection description at the top. Go to Collection page -> Heading section -> Set Only title
6) Scroll to the bottom to check the result
4. Issue Template
Expected Behavior
Describe the behavior you are expecting.
Current Behavior
Describe the current behavior.
Add screenshot or video
Failure Information
Provide information about the failure.
Add screenshot or video
Steps to Reproduce
Provide detailed steps for reproducing the issue.
Step 1
Step 2
...
Context
Provide any relevant information about your setup. This is important in case the issue is not reproducible except for under certain conditions.
Store URL
Theme Version: vX.Y.Z
Browser Name: Chrome, Safari, etc
Device: iPhone X, Laptop, etc
5. Shella theme :: How to install the Yotpo review app.
You may want to see the previous article for more details about product page files.
This article is for the Yotpo review app, but it may be useful if you want to install other Shopify apps. You may show this article to the app developer to help locate the needed theme file.
Let's install and configure the Yotpo app.
Yotpo widget @ product page
1) Install app & select Manual Installation. I hope in future the app author will add auto install option for the Shella theme.
2) Add Yotpo's Java-Script
Nothing special here. Open theme.liquid file and paste the app's code. (Online store -> Theme actions -> Edit code)
3) Install Reviews Widget
Open snippets/product-page-get-info.liquid file and paste the app's code in place you want to show the reviews widget.
4) Install Conversion Tracking
Follow the app instruction to add tracking code to the Checkout page. This is not a theme related part, cause the Shopify software doesn't allow to modify the Checkout page.
5) Review the result
Place Yotpo widget to the product tab.
1) Open snippets/product-page-get-tabs.liquid file
1) Open Yotpo app -> On-site Widgets -> Star Ratings
2) Press on Generate Code button
3) Press on Copy Code button
4) Open snippets/product-get-review.liquid file
5) Remove all content
6) Paste Yotpo code
7) Check the result
Thank you for using the Shella Shopify theme
6. Shella theme :: FAQ (versions 4 & 5)
About version 4
1) What features added to the theme version 4?
The theme front-end doesn't change.
We worked on the version 4 update for the six months.
Most improvements are related to the theme code. If review the code, it is about 30-40% of the new code.
You may notice the changes in the theme settings. We removed the hard to understand features. And try to make it easier.
You may stay with version 3, if you have an issue with the theme, our developer will fix it.
2) How to update to the theme version 4?
The theme version number 4 has significant changes and improvements. Unfortunately, the theme settings from version 3 are not compatible with version 4. If you want to use version 4, you should configure it 4 from scratch.
The update is not mandatory. You may stay with the previous theme version.
3) How long it will take to configure version 4 from scratch?
It depends on your store configuration. I believe it should be much faster and easier than in previous versions.
4) Is it possible to automatically copy theme settings?
Unfortunately, some software updates don't provide such an option. For example, Shopify announced the new features: Sections on every page, Master pages, etc. What does it mean for the theme developer? The theme developer should significantly rewrite the theme code. The theme developer should create a new theme from scratch to include new features in the theme editor. This is true for any software product, not only for the Shella Shopify theme.
Thank you for your understanding.
General
1) How to find the global settings?
Sections -> Global settings used to configure the custom product swatches at previous version (theme version 3x).
15) Why Shella theme does not support Internet Explorer
Unfortunately, we don’t support IE in our theme. We’ve analyzed browsers using statistics and detected that this browser is used by too small percent of users.
So, we’ve decided not to use it. Also, IE doesn’t support many modern features. Theme has poor functionality if it is developed for this browser.
16) How to change the “Sort by” on Collection page
The sorting order is generated by default Shopify logic.
The theme doesn't change this. It can't be regulated in theme's files.
You may edit the text in Shopify admin -> Online store -> Actions -> Edit languages, press tab “Collections” and scroll down to “Control sort by” block –
Me and the Yotpo team are having difficulties in installing the Star reviews on the Shella theme. This because you use a different naming for templates and all.
Can you please guide us on how to install the Yotpo Star Review under or above the product title on both the product pages and the Collection pages.
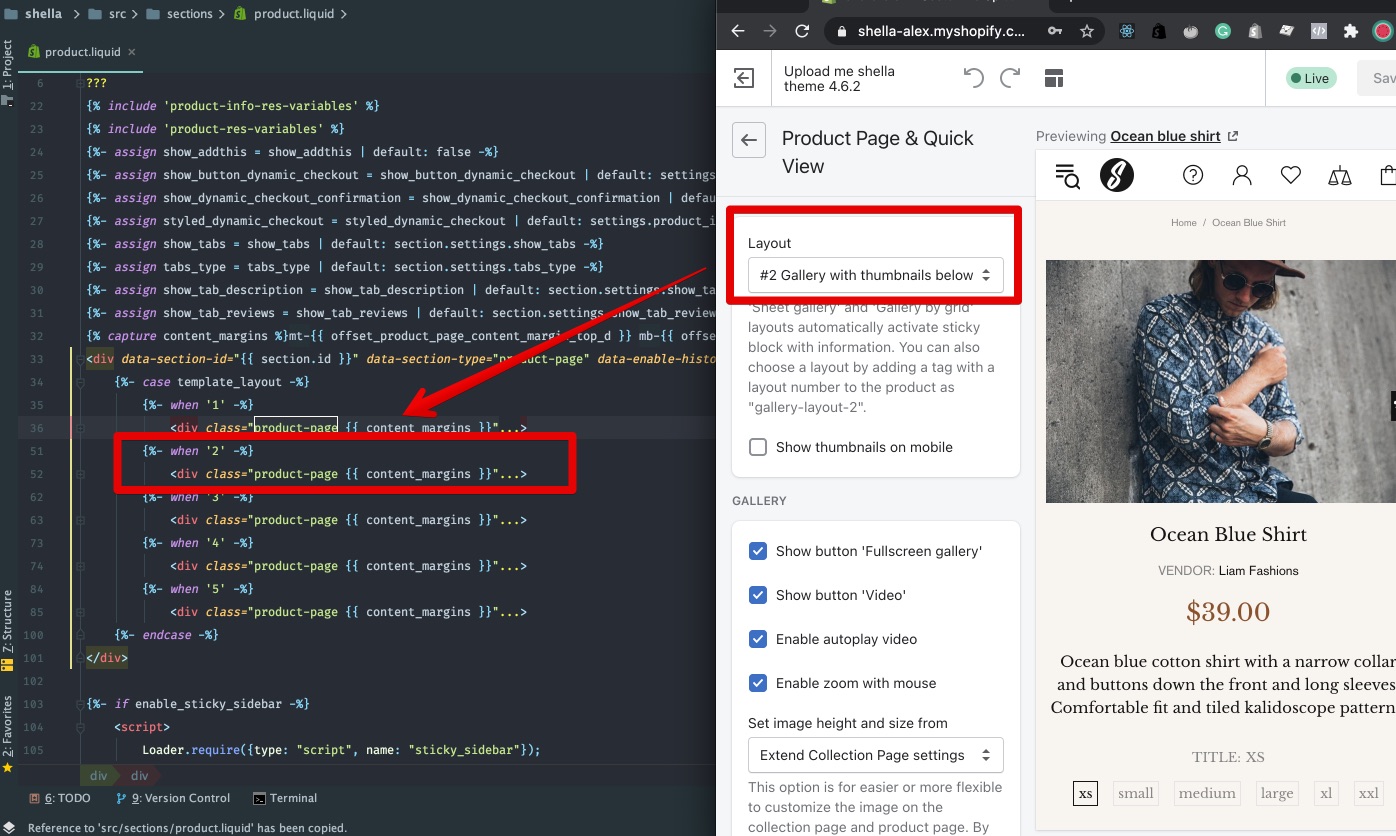
Product page files:
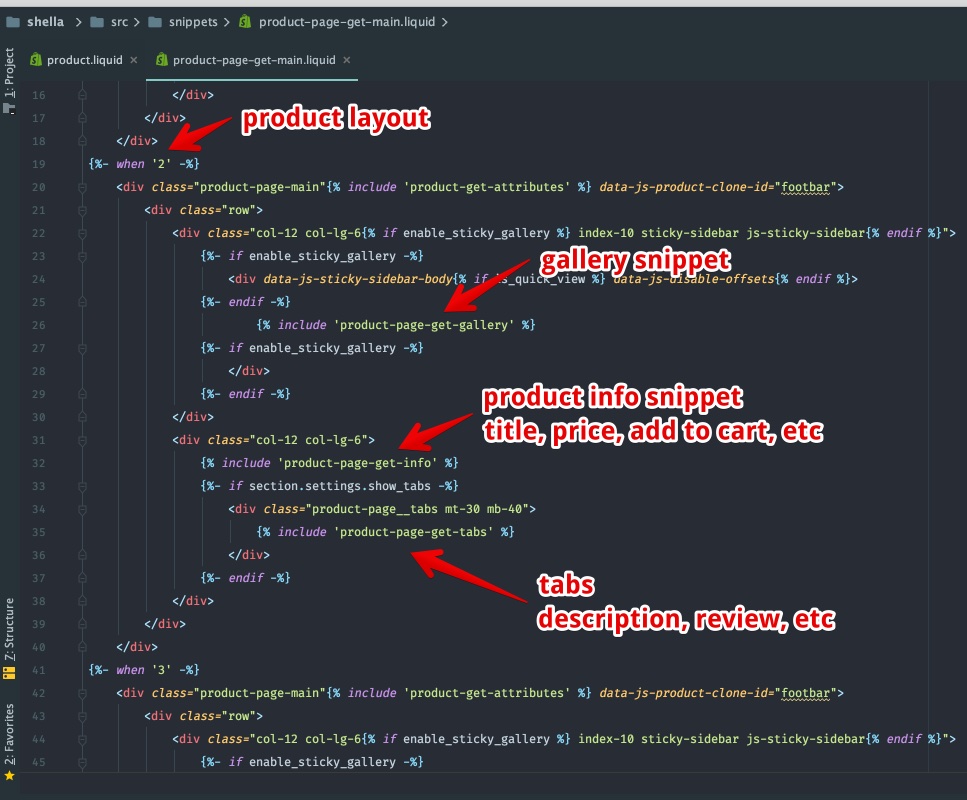
a) sections/product.liquid - start file. It prepares the variables, and includes, main product snippet depends on the product page layout selected at your theme settings.
b) snippets/product-page-get-main.liquid - includes gallery, info, and tabs snippets.
c) snippets/product-page-get-info.liquid - generates the product info
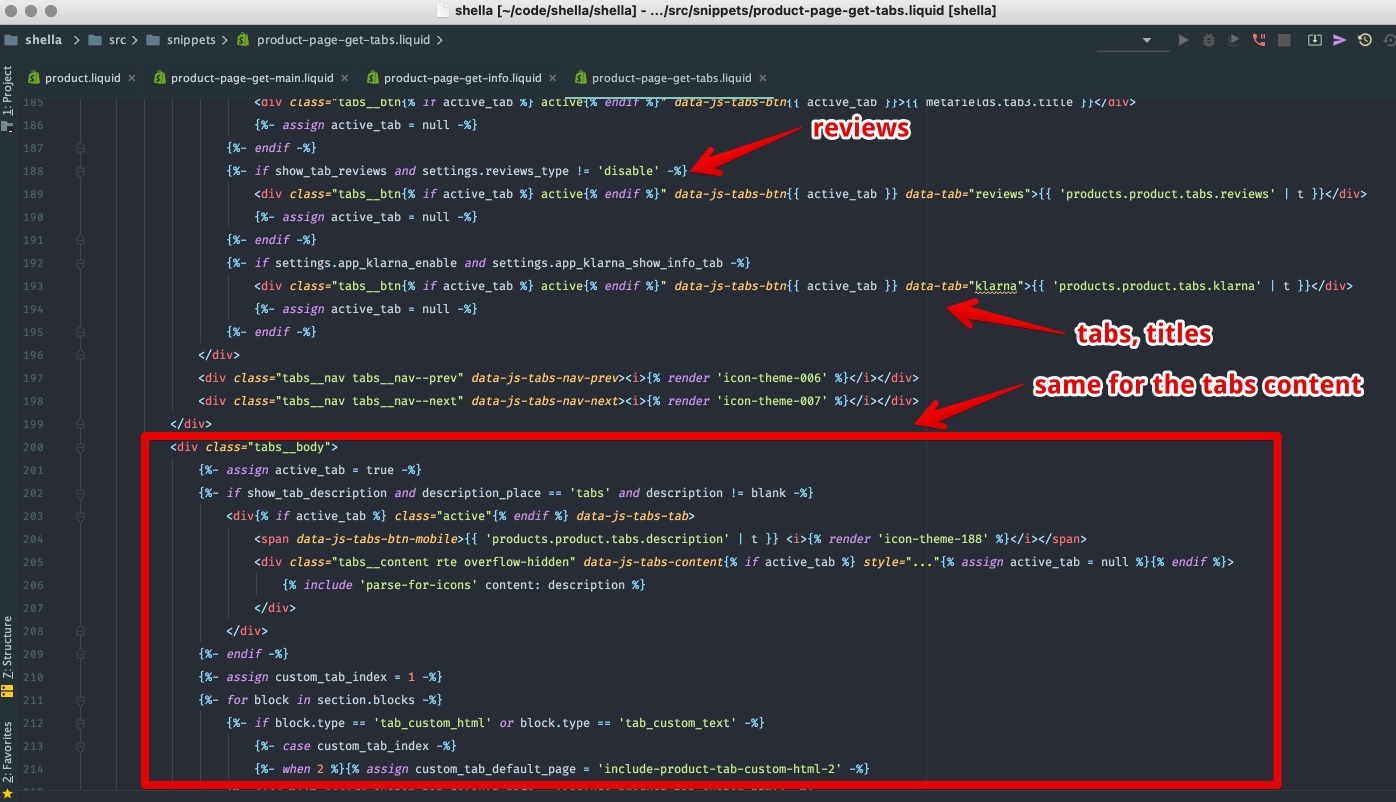
d) snippets/product-page-get-tabs.liquid - tabs
Tabs titles
Same for tabs content
I hope it will help you to understand the Shella product page file structure.
In next article I will guide you, how to insert app's code snippets based on Yotpo Star Review app.
Thank you for using the Shella Shopify theme.
8. Shella theme :: How to update Shella theme to version 6
Copy setting files
The simple answer is - Copy *.json configuration files. From old theme files to new theme files.
You may do it in various ways:
configure theme settings and sections via the Shopify theme editor;
copy files manually via Shopify online code editor;
copy the settings file with an Exim app;
Option #1
It is the easiest way. You just need time and patience.
Option #2
You should deal with code. You should be very careful, cause one missing quote or comma may break the file. You may filter all *.json files with theme settings and copy their content to the same files at a new theme.
Please note, the settings_schema.json file doesn't include theme settings. You shouldn't merge it.
Option #3
Install the Exim app. Export all theme settings files from the old theme version and import them to the new theme version. In this video tutorial, you may get the main idea of how to use the app.
Custom changes
In case you applied the custom source code changes - you should merge it manually
In case the app modifies theme source files (that app shouldn't do now) - you should contact the app's support and ask to apply app changes to a new theme version.
What is the recommended scenario?
The most robust is Option #1. It will work for any update.
Other variants are optional and may not work as expected.
I recommend starting with Option #3.
If it doesn't work for you and you can copy the content of *.json files - try Option #2.
If still doesn't work for you - go with Option #1.
Update Shella theme to version 6
Due to Shopify software major changes. The theme file structure changed. The settings are stored in other files.
The Option #1 works.
The bad news that Option #2 and Option #3 doesn't work for major changes.
The good news that you can combine Option #3 and Option #2 to move your theme configuration to a new version.
Here are the step by step instruction on how to do it. In my example I move theme settings from theme version 5 to version 6.
Step 1.
Perform the Option #3. Install Exim app, export settings from old theme, import settings to new theme.
Step 2. Home page content.
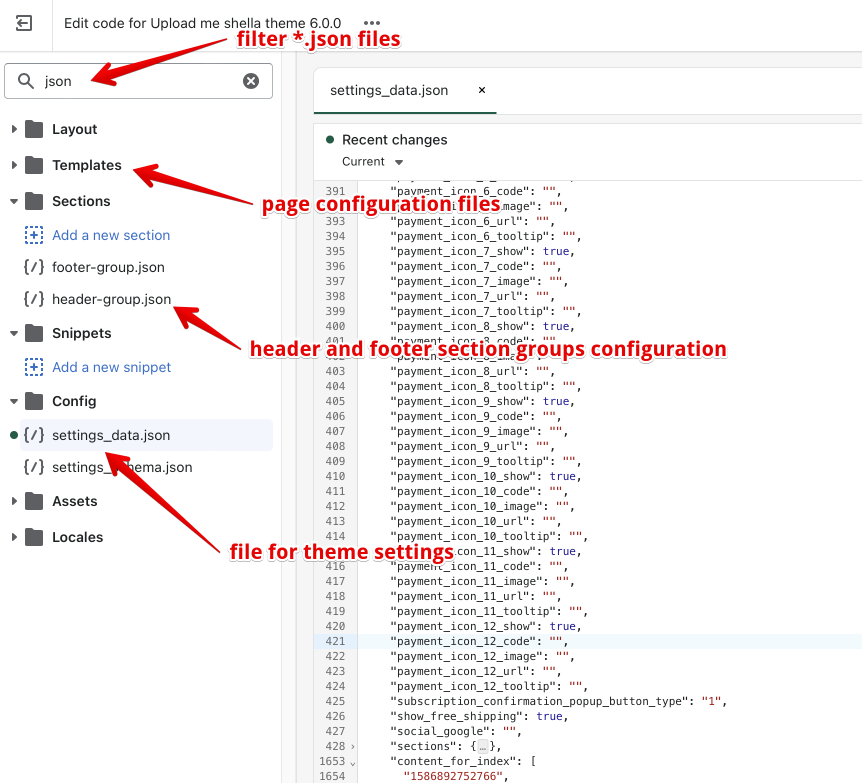
- open online code editor at "..." -> Edit code
- open config/settings_data.json file
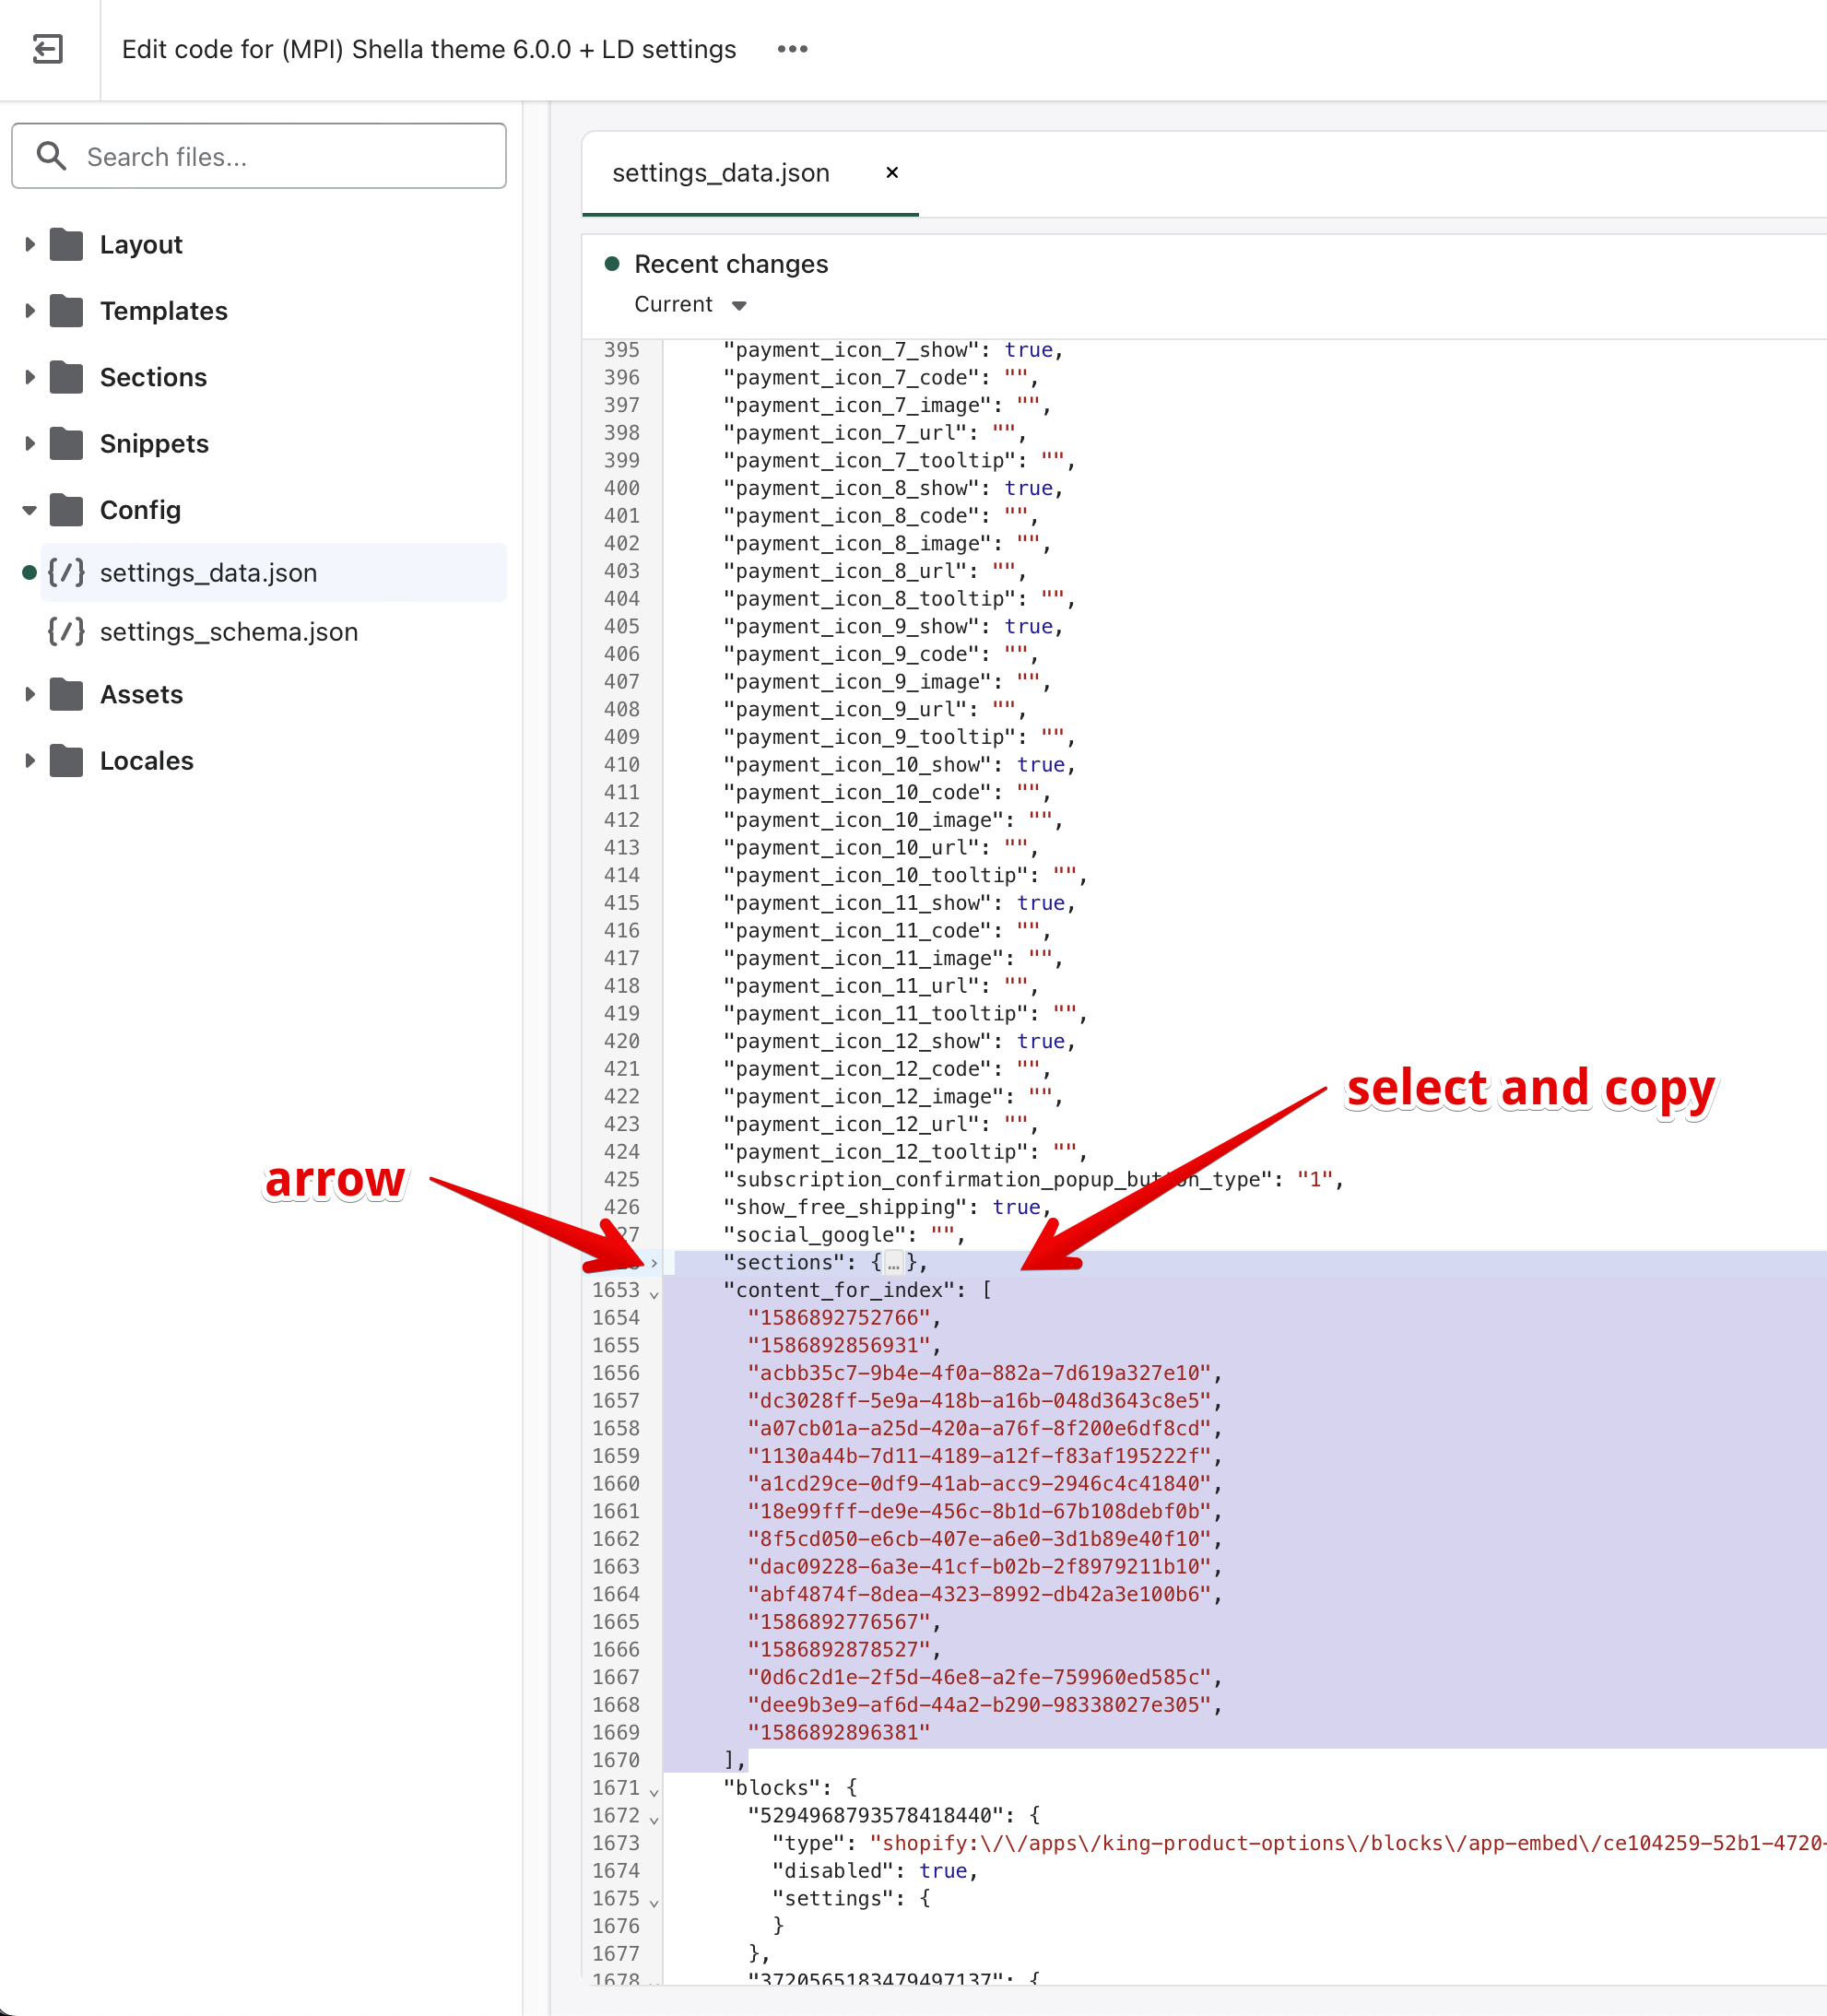
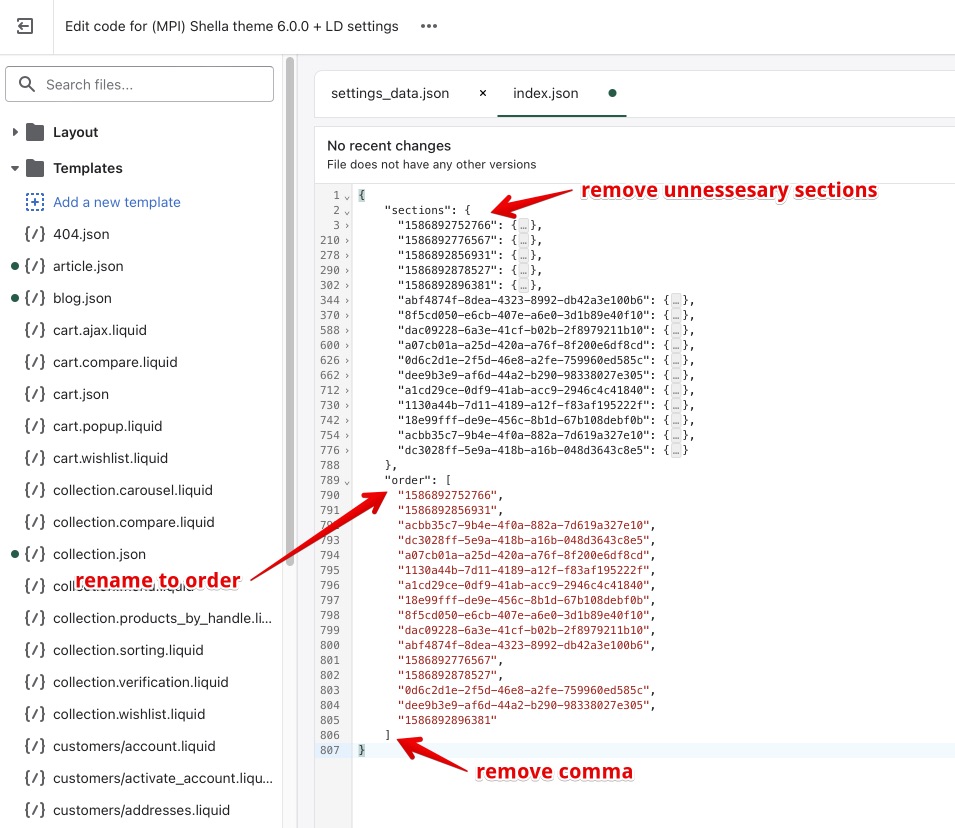
- scroll down to "sections", use the arrow to collapse entire node, select and copy "sections" and "content_for_index" nodes.
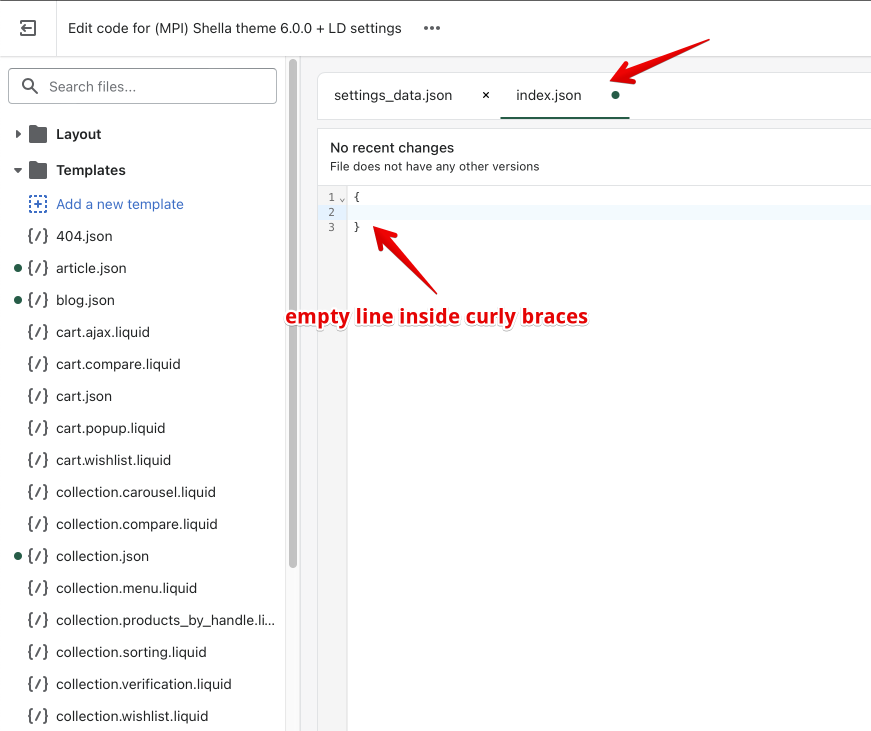
- open templates/index.json file
- select and delete "sections" and "order" nodes
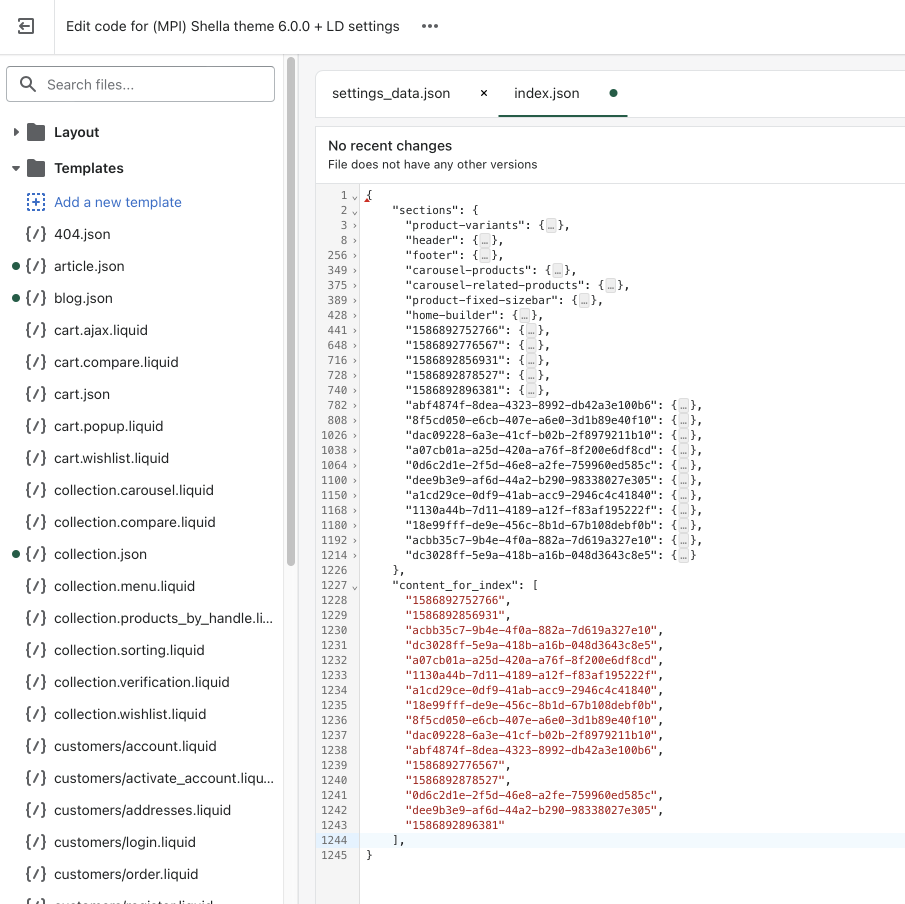
- paste "sections" and "content_for_index" nodes. Use arrow to collapse sections in the following way
- remove comma after the "content_for_index" node
- rename "content_for_index" node to "order"
- remove sections with readable identification. The "sections" node should have the same list as "order" node. You should get the following look
- save the file and check home page content at the theme editor.
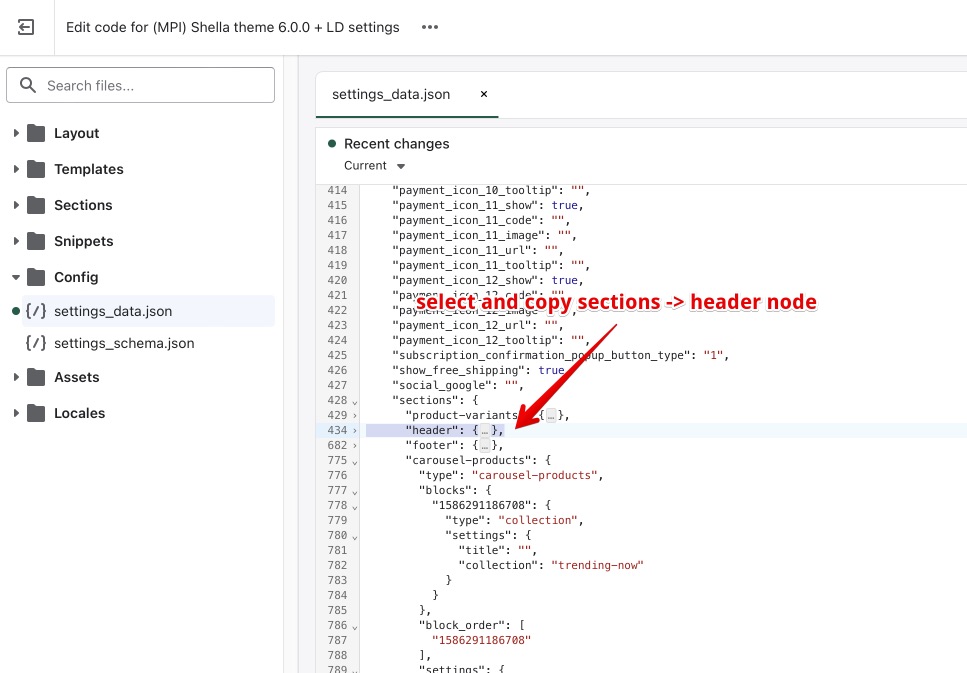
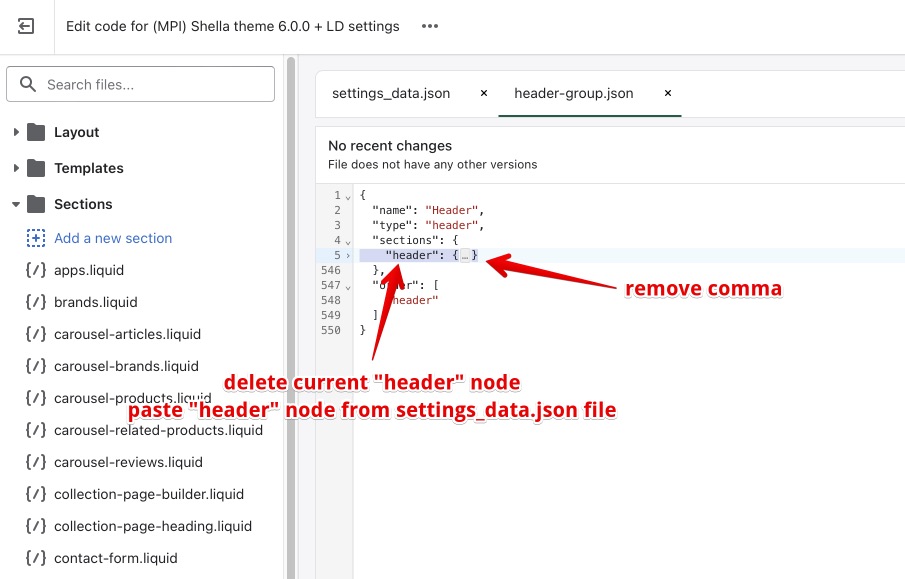
Step 3. Header.
- open config/settings_data.json file
- scroll down to "sections", use the arrow to collapse sections inside, select and copy "header" section node.
- open sections/header-group.json file
- delete current "header" node
- paste the "header" node from settings_data.json file
- remove comma, you should get the following
- save the file and check header at the theme editor.
Step 4. Footer.
Perfume the same steps for sections/footer-group.json file as for header.
- open config/settings_data.json file
- scroll down to "sections", use the arrow to collapse sections inside, select and copy "footer" section node.
- open sections/footer-group.json file
- delete current "footer" node
- paste the "footer" node from settings_data.json file
- remove comma, you should get the following
- save the file and check footer at the theme editor.
9. Feature Request Template
Start your ticket with the title "Feature Request: ...."
Make ticket public.
The feature request should include the following information.
Storefront
Describe how the feature should work at the storefront.
How to configure feature at the backend
Describe how to configure the feature at the backend.
Example store
Add the URL of the example store. Add steps on how to see the feature in actions.
Example Shopify theme
Add the Shopify theme name with this feature (optional).
If you found the existing feature request useful for your store, add a "+1" comment.
Shopify software doesn't recommend to modify the theme source files by the app.
Now the app should be installed via app blocks. Before you edit the theme source files, please contact the app's support first.
If the app blocks doesn't work in your case and you need to modify the product page source code. You may proceed with this article.
Product page files:
a) sections/main-product.liquid - start file. It prepares the variables, and includes, main product snippet depends on the product page layout selected at your theme settings.
b) snippets/product-page-get-main.liquid - includes gallery, info, and tabs snippets.
c) snippets/product-page-get-info.liquid - generates the product info
d) snippets/product-page-get-tabs.liquid - tabs
Tabs titles
Same for tabs content
I hope it will help you to understand the Shella product page file structure.
In next article I will guide you, how to insert app's code snippets based on Yotpo Star Review app.
Thank you for using the Shella Shopify theme.
11. Shella theme :: Support Policy
Response time may take up to 2 business days.
Installation and customization services are not included in the theme support service.
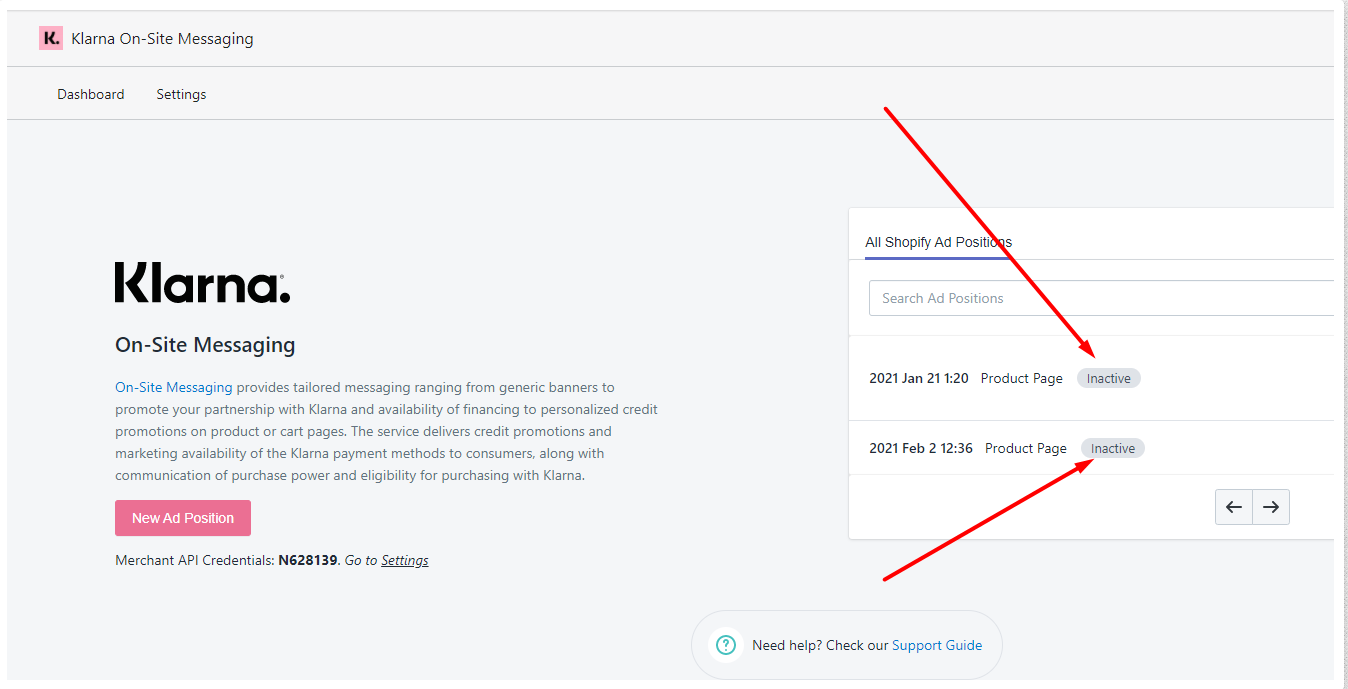
12. Shella theme :: How to install the Klarna app.
Please, make sure your theme is published, before starting to customize the Klarna app.
Activate the Klarna app for the Shella theme –
Navigate to Editor, Theme settings -> Apps & Language and enable an option “Enable Klarna app”. In order to show the app content and create a tab, navigate to Products -> Product page and press “Add block”. Then you will be able to add “Klarna App content” and “Tab for Klarna App”, if such need arises.
Now you can configure the display of the messages in the Product information section and in the tab.
You should apply settings in the Klarna app. Activate the messages and select what message should be displayed
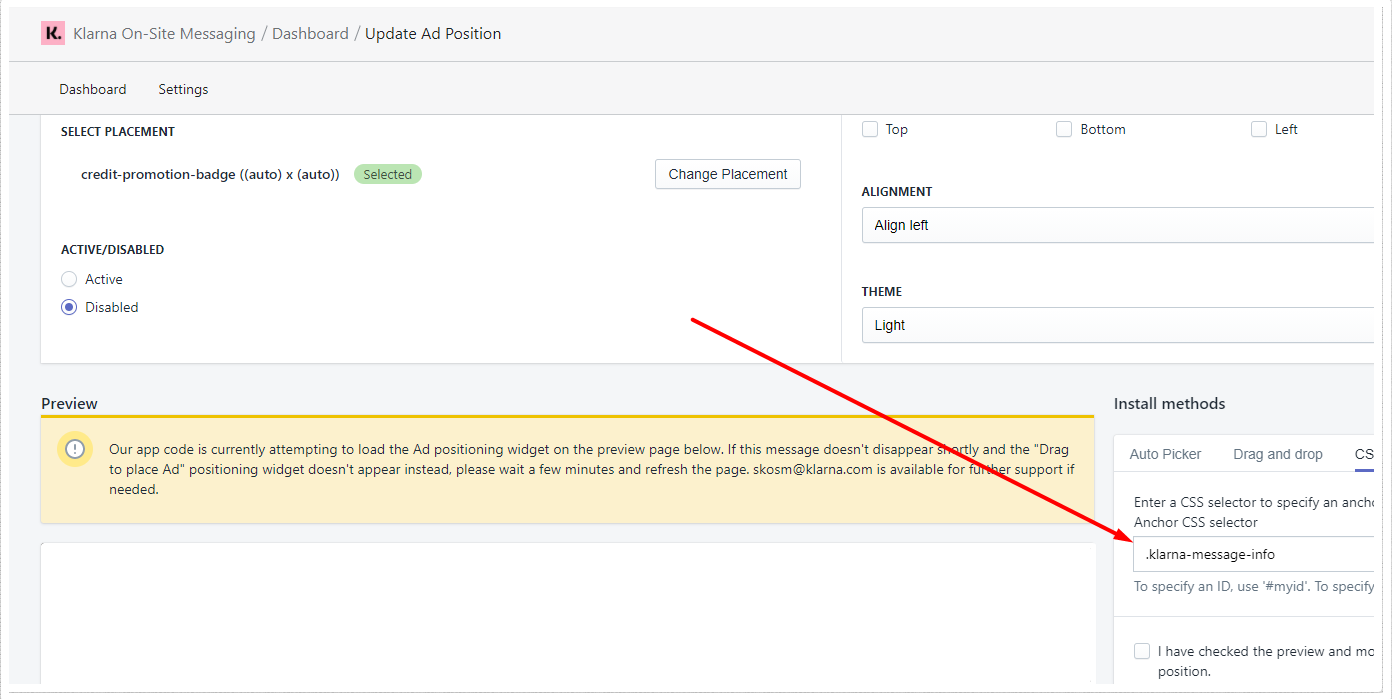
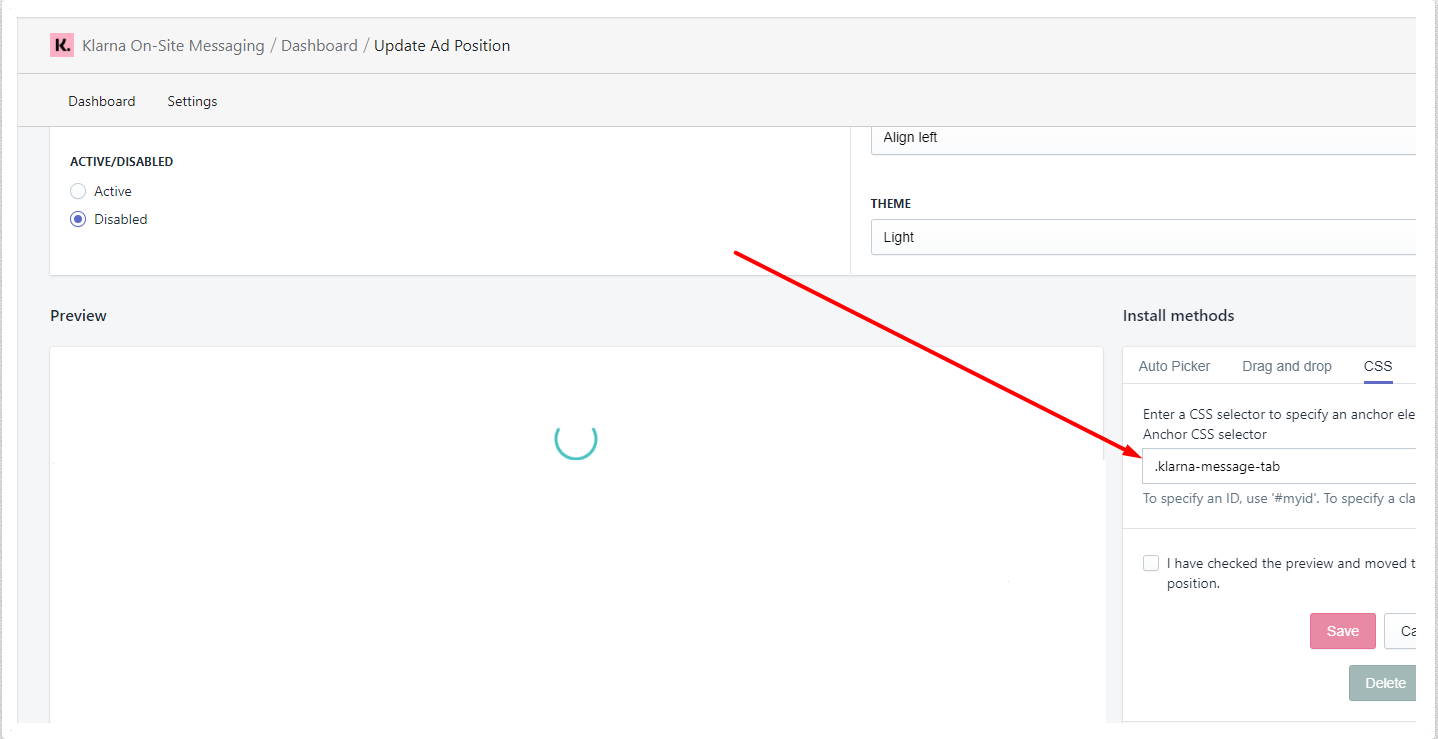
The place to display the message can be set by the class.
You can use the class .klarna-message-home on Static pages and Home page.
This code should be placed where you need to display the Klarna message -
< div class="klarna-message-home"> (use "< div" without a space)
Use any other class instead of .klarna-message-home for several Static pages, for example:
.klarna-message-home
.klarna-message-static
.klarna-message-home2
Use the Anchor CSS Selector to add messages from Klarna.
Classes for posting messages from Klarna on the product page: ".klarna-message-info", ".klarna-message-info2"
Class for posting messages from Klarna in an information tab on the product page: ".klarna-message-tab"
Class for posting messages from Klarna on the cart page: ".klarna-message-cart".
Please note, you should also apply changes to the corresponding class in HTML
You may also need to wait from 1 to 2 minutes before saving changes in the app, because app needs time to update changes and transfer data to the Shopify.
Then you can press button “Save”. And check changes in the Preview mode.
13. Shella theme :: How to Move the Collection Description to the Bottom
In case you want to show the collection description at the bottom of the page. You should perform the following steps.
Note: You should be able to edit the theme source code at Theme actions -> Edit code. Or hire a Shopify Expert to complete this task for you.
1) Create a backup copy of your theme at Theme actions -> Duplicate. You may quickly restore the working theme in case something goes wrong.
5) Cut it from the snippets/collection-head.liquid file & paste at the snippets/collection-page.liquid file. After the collection-body section
You should get
a) Updated snippets/collection-head.liquid file
b) Updated snippets/collection-page.liquid file
c) Collection description after the product list.
d) You may add additional margin with mt-100 class.
mt - short for margin top
100 - distance in pixels, you may use other number with set of 10 pixels.
It looks better now.
Done.
Thank you for using the Shella theme.
14. Shella theme :: Known issues and Solutions
Version 4.8.0
1. Footer or Header (elements) disappeared after update
This issue occurs if you've selected the color for an element and then removed the color. As the result, the transparent color is preserved in the settings.
The workaround is to remove all the lines with the color "rgba(0,0,0,0)" in the file config/settings_data.json
It can be easily done by searching (CTRL+F) in the file -
2. Can't change color of the Input background
You may need to add 3 lines of code to the file snippets/css-variables.liquid
After the lines:
--theme12: {{ settings.color_theme12 }};
{%- endif -%}
Code:
{%- if settings.color_theme13 and settings.color_theme13 != '' -%}